c++的库虽然不像python的库一样方便,但谷歌等公司还是出了一些非常好用的三方库,可以大大增加开发效率。
ProtoBuf
简介
Protobuf提供了一个可扩展的机制,用于序列化结构化的数据,可以方便的在代码中保存数据、读取数据、发送数据。Protobuf类似于JSON,但比JSON更小,更快。Protobuf中可以选择数据的保存方式,通常选择保存成二进制格式,二进制格式相比文本格式更省空间,且读取更快。
protobuf使用上类似于ROS的msg,通过.proto文件定义类型,在c++中直接通过结构体使用。这样的方式方便于跨语言跨平台的消息传递以及文件使用。
创建.proto文件
定义消息类型
首先,直接给出一个简单的.proto文件的示例
1
2
3
4
5
6
7
syntax = "proto3" ; message SearchRequest { string query = 1 ; int32 page_number = 2 ; int32 result_per_page = 3 ; }
第一行为指定使用proto3语法,如果不指定,默认使用proto2。注意:该文件第一行必须为非空
该消息一共有3个字段,每个字段都有一个名字和类型,这里还可以注意到后面等于了一个数字,这个数字为字段编号。
字段类型
字段类型和c语言等差不多,类型名+变量名的方式定义一个变量。
字段编号
消息定义中,每个字段都有一个唯一编号 。字段编号用于标识消息在二进制格式中的字段(如前面所示,通常选择将消息保存成二进制),且消息类型使用后不应该改变(改后读取以前的pbstream会出问题)。1-15字段编号占用1个字节,16-2047占用两个字节:频率出现较高的消息元素编号最好不要大于15 。具体规则查看参考文档。
字段规则
可以给消息里的每个字段指定一个规则:
singular:默认规则,可以有0个或1个该字段optional:和singular一样,不过可以检查该值是否明确设置(编程时发现这才是默认的?)repeated:该字段可以重复0次或多次map:如其名 多个消息类型
可以在单个.proto文件中定义多个消息类型:
1
2
3
4
5
6
7
8
9
message SearchRequest { string query = 1 ; int32 page_number = 2 ; int32 result_per_page = 3 ; } message SearchResponse { ... }
注释:这点和c、c++一样,就不过多介绍
保留字段
主要用于版本更新,通过保留删除的字段保证程序不会出现太大错误:
1
2
3
4
message Foo { reserved 2 , 15 , 9 to 11 ; reserved "foo" , "bar" ; }
默认值
解析消息后,如果读取的编码消息不含特定元素,则会返回默认值,不同类型默认值有所区别:
string:空字符串
bytes:空字节
bool:false
数值:0
枚举:默认第一个
message:取决于语言,c/c++中
枚举
首先,来看一个枚举类型使用的举例:
1
2
3
4
5
6
7
8
9
10
11
12
13
14
15
16
enum Corpus { CORPUS_UNSPECIFIED = 0 ; CORPUS_UNIVERSAL = 1 ; CORPUS_WEB = 2 ; CORPUS_IMAGES = 3 ; CORPUS_LOCAL = 4 ; CORPUS_NEWS = 5 ; CORPUS_PRODUCTS = 6 ; CORPUS_VIDEO = 7 ; } message SearchRequest { string query = 1 ; int32 page_number = 2 ; int32 result_per_page = 3 ; Corpus corpus = 4 ; }
枚举类型使用和c语言中枚举类型差不多,这里要注意的是,第一个元素必须映射到0 ,即必须有0,0必须是第一个。
同时,还可以对枚举类型赋别名,需要加上选项option allow_alias = true;,如下所示
1
2
3
4
5
6
7
enum EnumAllowingAlias { option allow_alias = true ; EAA_UNSPECIFIED = 0 ; EAA_STARTED = 1 ; EAA_RUNNING = 1 ; EAA_FINISHED = 2 ; }
导入
有时候,想要将消息分成多个问题,且相互之间可能要使用,就需要用到导入。首先,给出示例:
1
2
3
4
5
import "myproject/other_protos.proto" ;message SearchResponse { repeated Result results = 1 ; }
如上所示,使用import可以导入其他文件定义的message,然后直接使用。
如果要嵌套导入(A导入B,C导入A,想在C中直接使用B),需要在import是加上public:
1 2 3 import public "new.proto" ;import "other.proto" ;
嵌套
有时候,想要在消息里面定义和使用消息类型(和c++类一样),这时候就需要用到嵌套,首先看一下举例:
1 2 3 4 5 6 7 8 message SearchResponse { message Result { string url = 1 ; string title = 2 ; repeated string snippets = 3 ; } repeated Result results = 1 ; }
要在父消息以外的地方使用此消息,引用方法为Parent.Type:
1 2 3 message SomeOtherMessage { SearchResponse.Result result = 1 ; }
更新消息类型
想要在不更改旧代码的条件下创建添加或移除字段,需要符合一下规则:
不能修改现有字段编号
新消息可以用旧代码解析,旧消息也可以用新代码解析,但解析时需要做好默认值判断
移除时最好保留该字段(用reserve),防止未来不小心使用
int32、uint32、int64、uint64
和 bool
都兼容,可以将字段从一种类型更改为另一种类型,而不会破坏向前或向后兼容性(读取和存储时自动转)。还有很多,具体查看官方文档...
单个类型
可以查看官方文档
可以使用package指定命名空间(c++中)
使用.proto文件生成对应文件
首先需要安装proto文件编译器:https://developers.google.com/protocol-buffers/docs/downloads
然后使用命令行编译,编译命令如下所示:
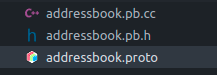
1 protoc -I=$SRC_DIR --cpp_out=$DST_DIR $SRC_DIR /addressbook.proto
其中SRC_DIR为源文件的目录(可有可无),DST_DIR为生成的目标文件目录,后面跟要编译的.proto文件。最后编译出来一个.h和一个.cc文件。
使用
使用前注意编译,由于使用的proto3,这里可以使用以下方法在cmake中查找和添加对应的include和link选项:
1 2 3 find_package (Protobuf 3.0 .0 REQUIRED)include_directories (${Protobuf_INCLUDE_DIR} )target_link_libraries (write ${Protobuf_LIBRARY} )
然后是api的使用,大部分api在生成的.h文件里面可以找到,以及官方文档中可以找到,这里我给出官方的写入和读取示例。
首先是写入:
1 2 3 4 5 6 7 8 9 10 11 12 13 14 15 16 17 18 19 20 21 22 23 24 25 26 27 28 29 30 31 32 33 34 35 36 37 38 39 40 41 42 43 44 45 46 47 48 49 50 51 52 53 54 55 56 57 58 59 60 61 62 63 64 65 66 67 68 69 70 71 72 73 74 75 76 77 78 79 80 81 82 83 84 85 86 87 88 89 90 91 92 #include <fstream> #include <iostream> #include <string> #include "addressbook.pb.h" using namespace std;void PromptForAddress (tutorial::Person* person) cout << "Enter person ID number: " ; int id; cin >> id; person->set_id (id); cin.ignore (256 , '\n' ); cout << "Enter name: " ; getline (cin, *person->mutable_name ()); cout << "Enter email address (blank for none): " ; string email; getline (cin, email); if (!email.empty ()) { person->set_email (email); } while (true ) { cout << "Enter a phone number (or leave blank to finish): " ; string number; getline (cin, number); if (number.empty ()) { break ; } tutorial::Person::PhoneNumber* phone_number = person->add_phones (); phone_number->set_number (number); cout << "Is this a mobile, home, or work phone? " ; string type; getline (cin, type); if (type == "mobile" ) { phone_number->set_type (tutorial::Person::MOBILE); } else if (type == "home" ) { phone_number->set_type (tutorial::Person::HOME); } else if (type == "work" ) { phone_number->set_type (tutorial::Person::WORK); } else { cout << "Unknown phone type. Using default." << endl; } } } int main (int argc, char * argv[]) GOOGLE_PROTOBUF_VERIFY_VERSION; if (argc != 2 ) { cerr << "Usage: " << argv[0 ] << " ADDRESS_BOOK_FILE" << endl; return -1 ; } tutorial::AddressBook address_book; { fstream input (argv[1 ], ios::in | ios::binary) ; if (!input) { cout << argv[1 ] << ": File not found. Creating a new file." << endl; } else if (!address_book.ParseFromIstream (&input)) { cerr << "Failed to parse address book." << endl; return -1 ; } } PromptForAddress (address_book.add_people ()); { fstream output (argv[1 ], ios::out | ios::trunc | ios::binary) ; if (!address_book.SerializeToOstream (&output)) { cerr << "Failed to write address book." << endl; return -1 ; } } google::protobuf::ShutdownProtobufLibrary (); return 0 ; }
然后是读取:
1 2 3 4 5 6 7 8 9 10 11 12 13 14 15 16 17 18 19 20 21 22 23 24 25 26 27 28 29 30 31 32 33 34 35 36 37 38 39 40 41 42 43 44 45 46 47 48 49 50 51 52 53 54 55 56 57 58 59 60 61 62 63 64 65 #include <iostream> #include <fstream> #include <string> #include "addressbook.pb.h" using namespace std;void ListPeople (const tutorial::AddressBook& address_book) for (int i = 0 ; i < address_book.people_size (); i++) { const tutorial::Person& person = address_book.people (i); cout << "Person ID: " << person.id () << endl; cout << " Name: " << person.name () << endl; if (person.email () != "" ) { cout << " E-mail address: " << person.email () << endl; } for (int j = 0 ; j < person.phones_size (); j++) { const tutorial::Person::PhoneNumber& phone_number = person.phones (j); switch (phone_number.type ()) { case tutorial::Person::MOBILE: cout << " Mobile phone #: " ; break ; case tutorial::Person::HOME: cout << " Home phone #: " ; break ; case tutorial::Person::WORK: cout << " Work phone #: " ; break ; } cout << phone_number.number () << endl; } } } int main (int argc, char * argv[]) GOOGLE_PROTOBUF_VERIFY_VERSION; if (argc != 2 ) { cerr << "Usage: " << argv[0 ] << " ADDRESS_BOOK_FILE" << endl; return -1 ; } tutorial::AddressBook address_book; { fstream input (argv[1 ], ios::in | ios::binary) ; if (!address_book.ParseFromIstream (&input)) { cerr << "Failed to parse address book." << endl; return -1 ; } } ListPeople (address_book); google::protobuf::ShutdownProtobufLibrary (); return 0 ; }
我这里再记录几个使用过程中总结的api
set_xxx
直接设置xxx的值,一般用于int等常见类型的值写入
1 2 tutorial::Person person; person.set_id (id);
add_xxx
一般用于reapeat的变量,返回该变量的指针,然后再设置值
1 2 auto * const trajectory_proto = proto.add_trajectory ();trajectory_proto->set_trajectory_id (trajectory_id);
mutable_xxx
返回变量的指针,可以直接对其赋值实现修改,一般用于嵌套的结构的修改
1 2 *submap_proto->mutable_pose () = transform::ToProto (submap_id_data.data.pose);
PCL库
PCL里实现了大量的处理点云相关的功能,实现了大量点云相关的通用算法和高效数据结构,涉及到点云获取、滤波、分割、配准、检索、特征提取、识别、追踪、曲面重建、可视化等。
CMakeLists
1 find_package (PCL REQUIRED QUIET)
基本使用
将激光消息转换为PCL格式
一般SLAM中,激光的格式为sensor_msgs::LaserScan,使用PCL库进行处理前,需要将格式转换为PCL库中表示激光的格式,这里先直接给出转换代码:
1 2 3 4 5 6 7 8 9 10 11 12 13 14 15 16 17 18 19 20 pcl::PointCloud<pcl::PointXYZ> ConvertScantoPointCloud (const sensor_msgs::LaserScan::ConstPtr &scan_msg) { pcl::PointCloud<pcl::PointXYZ> cloud_points; pcl::PointXYZ point; for (int i = 0 ; i < scan_msg->ranges.size (); ++i) { float range = scan_msg->ranges[i]; if (!std::isfinite (range)) { continue ; } if (range > scan_msg->range_min && range < scan_msg->range_max) { float angle = scan_msg->angle_min + i * scan_msg->angle_increment; point.x = range * cos (angle); point.y = range * sin (angle); point.z = 0.0 ; cloud_points.push_back (point); } } return cloud_points; }
通过上述代码就可以得到点云,上述的点云是没有位姿的,相当于中心在原点的激光。其中,定义点云的方式为pcl::PointCloud<pcl::PointXYZ>,其中pcl::PointXYZ表示点的格式。
对点云进行坐标变换
将激光转换为点云时,丢失了点云的坐标信息,要将点云调整到其他地方可以用以下方式实现:
1 2 3 4 pcl::transformPointCloud (*main_scan_pointcloud_, *main_scan_pointcloud_init_transformed_, transform_martix_);
这里要注意,不管是坐标变换还是进行icp配准,得到的结果都是相对于圆心的,而不是相对于变换前的中心。这里在使用时需要注意。
发布点云
发布点云时,一般会将其转换为ros中的消息格式,代码如下:
1 2 3 4 sensor_msgs::PointCloud2 cloud_msg; pcl::toROSMsg (*in_cloud_to_publish_ptr, cloud_msg); cloud_msg.header.frame_id = pointcloud_frame_str_; final_point_cloud_pub_.publish (cloud_msg);
注意
icp使用时需要注意,source和target的定义和ROS中tf有点不一样
1 2 3 icp.setInputSource (B); icp.setInputTarget (A); icp.align (*C);
上述代码求出来的变换矩阵是\(_B^AT\)
CSM库
这个主要用来做PL-ICP配准的。
基本使用
点云转换
CSM库中,使用的点云格式为LDP,将ROS中的LaserScan转换为LDP代码如下所示:
1 2 3 4 5 6 7 8 9 10 11 12 13 14 15 16 17 18 19 20 21 22 23 24 25 26 27 28 29 30 31 32 33 34 35 36 37 38 39 40 41 void MultiLidarCalibration::LaserScanToLDP ( const sensor_msgs::LaserScan::ConstPtr &scan_msg, LDP &ldp) unsigned int n = scan_msg->ranges.size (); if (ldp != nullptr ) { ROS_INFO ("maybe memory bug" ); } ldp = ld_alloc_new (n); for (unsigned int i = 0 ; i < n; i++) { double r = scan_msg->ranges[i]; if (r > scan_msg->range_min && r < scan_msg->range_max) { ldp->valid[i] = 1 ; ldp->readings[i] = r; } else { ldp->valid[i] = 0 ; ldp->readings[i] = -1 ; } ldp->theta[i] = scan_msg->angle_min + i * scan_msg->angle_increment; ldp->cluster[i] = -1 ; } ldp->min_theta = ldp->theta[0 ]; ldp->max_theta = ldp->theta[n - 1 ]; ldp->odometry[0 ] = 0.0 ; ldp->odometry[1 ] = 0.0 ; ldp->odometry[2 ] = 0.0 ; ldp->estimate[0 ] = 0.0 ; ldp->estimate[1 ] = 0.0 ; ldp->estimate[2 ] = 0.0 ; ldp->true_pose[0 ] = 0.0 ; ldp->true_pose[1 ] = 0.0 ; ldp->true_pose[2 ] = 0.0 ; }
我在项目中,还需要先对点云做坐标变换,再用LDP配准,我这里将点云转换为PCL格式,然后进行坐标变换,再转换为LDP进行配准,PCL转LDP代码如下所示:
1 2 3 4 5 6 7 8 9 10 11 12 13 14 15 16 17 18 19 20 21 22 23 24 25 26 27 28 29 30 31 32 33 34 35 36 37 void MultiLidarCalibration::PclToLDP ( const pcl::PointCloud<pcl::PointXYZ> &pcl_src, LDP &ldp) unsigned int n = pcl_src.size (); std::map<float , float > laser_scan; ldp = ld_alloc_new (n); for (unsigned int i = 0 ; i < n; i++) { laser_scan.emplace (GetTheta (pcl_src[i]), GetRange (pcl_src[i])); } int i = 0 ; for (const auto &each_ray : laser_scan) { ldp->valid[i] = 1 ; ldp->readings[i] = each_ray.second; ldp->theta[i] = each_ray.first; ldp->cluster[i] = -1 ; i++; } ldp->min_theta = ldp->theta[0 ]; ldp->max_theta = ldp->theta[n - 1 ]; ldp->odometry[0 ] = 0.0 ; ldp->odometry[1 ] = 0.0 ; ldp->odometry[2 ] = 0.0 ; ldp->estimate[0 ] = 0.0 ; ldp->estimate[1 ] = 0.0 ; ldp->estimate[2 ] = 0.0 ; ldp->true_pose[0 ] = 0.0 ; ldp->true_pose[1 ] = 0.0 ; ldp->true_pose[2 ] = 0.0 ; }
这里还使用了两个小函数:
1 2 3 4 5 6 inline float GetRange (const pcl::PointXYZ &point) return sqrt (point.x * point.x + point.y * point.y); } inline float GetTheta (const pcl::PointXYZ &point) return atan2 (point.y, point.x); }
注意事项
遇到的bug
做PL-ICP时遇到这个bug
1 failed: after trimming, only 0 correspondences.
这是由于忘了设置激光范围导致的,如果不设置激光范围,可能导致所有激光被过滤掉。可以在第一次接收到激光数据时设置:
1 2 3 4 5 6 if (!is_reading_range_init_) { is_reading_range_init_ = true ; input_.min_reading = in_main_scan_msg->range_min; input_.max_reading = in_main_scan_msg->range_max; }
gtsam
简介
gtsam是一个因子图优化库,里面实现了不少功能,本来打算另开一篇博客,但目前只使用他的基本功能和边缘化功能,先记录再这里,以后有机会再独立出去。
gtsam优化的原理很简单,基本原理就是求因子图的最大后验分布,在概率图模型中,经常假设节点服从高斯分布,所以最大后验分布很容易证明就是最小二乘解,下面我通过举例的方式简单证明一下。
gtsam优化原理
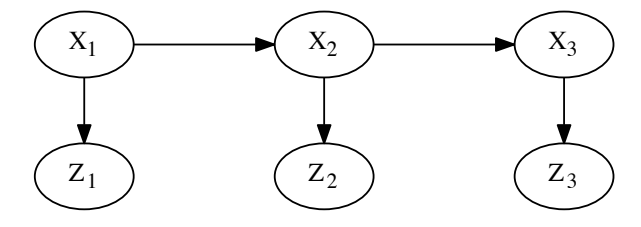
首先,在SLAM中常用的因子图是基于贝叶斯网络生成的,如下贝叶斯网络:
很显然这里\(z\) 和\(x\) 的关系就是观测变量和状态变量的关系,\(x_1\) 和\(x_2\) 之间的关系就是里程计的关系: \[
z_i=f(x_i) \\
x_{i+1}=f(x_i)
\] 则对于单个节点,比如\(z_1\) 、\(x_2\) 有分布: \[
z_1=f_1(x_1)+v_1\\
x_2=f_2(x_1)+v_2
\] 其中,\(v_1\sim
N(0,\sigma^2)\) ,根据上述表达式可以很容易求出\(p(z_1|x_1)\) 或\(p(x_2|x_1)\) 的分布,比如\(p(z_1|x_1)\) 的分布 \[
p(z_1|x_1)\propto
exp\left\{-\frac{1}{2}||f(x_1)-z_1||^2_{\Sigma_k}\right\}
\]
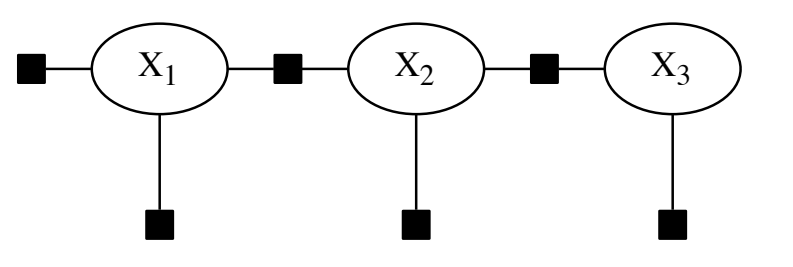
将其转换为因子图,这两者如何转换成因子图我就不介绍了,其实就是另一个表达,下图中每一个节点就是一个因子。
则是因子图的概率分布可以写成: \[
p(x)=\prod_{i}L(x_i)
\] 其中\(L(x_i)\) 为因子节点,很显然有关系\(L(x_1,x_2)\propto p(x_2|x_1)\) 。对其求MAP:
\[
\arg\max_x{\prod_i{L(x_i)}}\propto{\prod_i{exp\left\{-\frac{1}{2}||f(x_1)-z_1||^2_{\Sigma_k}\right\}}}
\] 然后其对数似然函数为(这里每一项其实需要根据实际情况更改):
\[
\arg\min_x{\frac{1}{2}\sum_i{||f_i(x_i)-z_i||^2_{\Sigma_i}}}
\] 很显然,可以看出其MAP和优化的最小二乘是等价的。
gtsam如何得到后验概率分布
优化的原理貌似很简单,但是对于优化后的协方差等是如何求解的还不清楚,后面再详细看。这里用举例的方式介绍一种由因子图计算信息矩阵的方法。
首先,因子图模型如下:
其概率分布可以写做:
将其化简,写成多元高斯分布矩阵形式:
可以得到其中xx就是信息矩阵
说明 :这里提到的方法应该不是gtsam内部的实现,gtsam内部的实现目前还没看,这里介绍的只是前段时间看到的一个方法
了解了gtsam的基本原理后,接下来了解一下gtsam的使用
基本使用
使用gtsam边缘化
参考文献
Protobuf:
https://developers.google.com/protocol-buffers/docs/proto3
Pcl:
https://zhuanlan.zhihu.com/p/334374878
https://pointclouds.org/