记录一下上课和平时积累的
语法
verilog的语法相比其他语言比较少,用于描述硬件,要实现功能主要还是模块之间的组合
基本结构和语句要求
每个.v文件就是一个module,代码写再module和endmoudule之间,moudule后跟模块名,以及模块的输入输出,模块内部实现功能。输入输出有两种写法,看自己习惯:
- 放在括号内
1 | module a(input a, b, output c, d); |
- 放在括号外
1 | module a(a,b,c,d); |
数据类型
parameter:常量- 常量位宽和进制设置
1
parameter a = 3'b101
reg:寄存器,主要在时序逻辑电路中,生成出来主要是D触发器wire:可以理解为线设置位宽
1 | reg [3:0] a |
逻辑功能描述
assign:如果逻辑能用一句话描述清楚可以使用assign语句1
assign x = (b & ~c)
always:如果逻辑比较复杂,使用always块描述- 敏感列表:在
always @()中的括号里面,也就是该always块触发条件,常见的条件有:posedge:信号上升沿negedge:信号下降沿*:所有,一般描述组合逻辑
1
2
3
4
5
6always @(posedge clk) begin // 每当时钟上升沿到来时执行
if (load)
out = data;
else
out = data + 1 + cin;
end- 敏感列表:在
关键字
关键字是实现定义好的符号
门结构
- and/xand:与/与非
- not:非
- or/xor:或/或非
- buf:
选择结构
if-else结构:综合出来一般带优先级,多级的选择结构
1
2
3
4if (load)
out = data;
else
out = data + 1 + cin;case结构casex结构
其他
- assign、always、while。。。等等
运算符
| 运算符 | 符号 | 功能 |
|---|---|---|
| 关系运算符 | <,>,<=,>=... | 和c语言一样 |
| 归约运算符和按位运算符 | &、^、|、~| | 一元运算符,归约运算,所有bit项相与;二元时,按位与 |
| 逻辑运算符 | !、&&、|| | 和c语言一样 |
| 位运算符 | ~、&、|、^ | 和c语言一样 |
| 移位运算 | <<、>> | 和c语言一样 |
| 条件运算符 | ?: | 和c语言一样(一般在assign语句中使用) |
| 位拼接运算符 | {,} | 实现增长位宽的作用,将多个数据拼接,eg:d = {a, b, c}; |
| 算数运算 | +、-、*、/、% | 和c语言一样 |
模块化设计
常用的一些模块往往设计成一个module,其他模块里面可以直接调用,使用方法如下:
写好需要的module
在要用的模块里面实例化:对input和output进行连线,output只能连到wire类型的线上
1
2
3
4
5
6
7/* 实例化,将线连接到自己的例程 */
key_filter u_key_filter( // 模块名
.clk (clk) , // 时钟输入信号
.key (key) , // 复位信号,低电平有效
.rst_n (rst_n) ,
.key_out (key_out)
);如果当前文件是最终的,设置为顶层后再全部编译
技巧
可以把输出定义为
wire,赋值使用reg,在外面用assign对wire赋值同步复位和异步复位:
- 同步复位:复位信号和时钟同步(复位信号不在敏感列表)
- 异步复位:只要有reset就复位,不和时钟同步,代码如下所示:
1
2
3always @(negedge clk or posedge reset) begin
...
end找到公用电路,尽早实现(如选择)
其他默认规则
if和case语句:最好把所有状态描述完(写全),不然综合会出现锁存器(有些状态没描述,锁存上一次状态)在
always中赋值的变量,一定要定义为reg类型if-else比switch-case更占空间,没优先级最好用switch-case组合逻辑中一般用非阻塞赋值,也就是
<=赋值产生触发器不取决于
reg,取决于敏感列表negedge clkD触发器的产生,敏感列表有
edge,非阻塞赋值时,左边就是Q,右边就是D
常见模块
状态机
状态机可以实现基本所有功能
- 一般至少两个always块,实现组合和时序
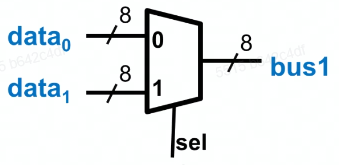
多路复用器Multiplexer
画出原理图
写输入输出
1
2
3module Mux8 (input sel, input [7:0] data1, data0, output [7:0] bus1);
endmodule写逻辑
- 简单的
1
assign bus1 = sel ? data1: data0;
- 复杂的
1
2
3
4
5
6
7
8always @(*)
begin
case(sel)
0:
1:
default:
endcase
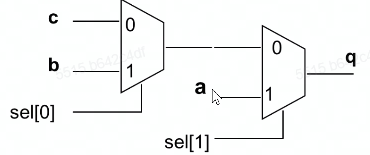
end其他结构(带优先级的)
- 代码实现
1
2
3
4
5
6always @(*)
begin
if();
else if();
else;
end
编码器和译码器Encoder/Decoder
确定输入输出关系
代码实现
- 确定输入输出
1
2
3
4
5
6
7module Code42(F, I, en);
output [1:0] F;
input [3:0] I;
input en;
reg [1:0] t;
assign F = en ? t : 2‘bz;
endmodule;- 普通
1
2
3
4
5
6
7
8always @(I)
begin
case(I)
1: t = 0;
2: t = 1;
default: t=0;
endcase
end1
2
3
4
5
6
7
8
9
10
* 带优先级的(`if-else`)
```verilog
always @ (I)
begin
if(I[3]) t = 2'b11;
else if(I[2]) t = 2'b10;
else t = 2'b00;
end
带优先级的(
switch-case)1
2
3
4
5
6
7
8always @ (I)
begin
casex(Data)
3'b1xx: t = 2'b11;
3'b01x: t = 2'b10;
default: t = 2'bx;
endcase
end
加法器
写真值表
代码描述
- 普通
1
2
3
4module fulladder(input a, b, cin, output sum, cout);
assign sum = a ^ b ^ cin;
assign cout = (a & b) | (a & cin) | (b & cin);
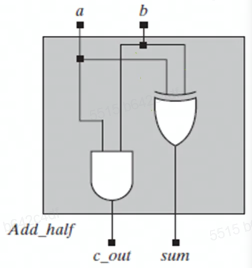
endmodule- 知道结构(结构化描述)
1
2
3
4
5
6module Add_half(sum, c_out, a, b);
output sum, c_out;
input a, b;
xor(sum, c, b);
and(c_out, a, b);
endmodule- 用库实现
1
2
3
4
5
6
7module Adder4(A, B, Cin, S, Cout);
input [3:0] A, B;
input Cin;
output [3:0] S;
output Cout;
assign {Cout, S} = A + B + Cin;
endmodule- 溢出(对有符号的数,判断最高位,也就是符号位是否出错)
1
2
3
4
5
6
7
8module Adder4(A, B, Cin, S, Cout, Ovout);
input [3:0] A, B;
input Cin;
output S;
output Cout, Ovout;
assign {cout,S} = A + B + Cin;
assign Ovout = (A[3]==B[3]) && (S[3]!=A[3]);
endmodule
ALU
确定功能(四则运算?)
代码实现
- 基本
1
2
3
4
5
6
7
8
9
10
11
12
13
14
15module ALU8(left, right, mode, ALUout);
input [7:0] left, right;
input [1:0] mode;
output reg [7:0] ALUout;
always @(left, right, mode)
begin
case (mode)
2'b00: ALUout = A + B;
2'b01: ALUout = A - B;
2'b10: ALUout = A & B;
2'b11: ALUout = A | B;
default: ALUout = 8'bX;
endcase
end
endmodule
触发器
- 确定功能
- 代码实现
1 | module Flop (reset, clk, din, qout) |
计数器
- 确定计数器的大小
- 代码实现
1 | module Counter4 (reset, clk, count); |
移位寄存器
确定位数
代码实现
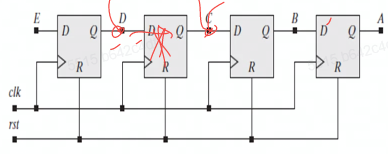
D触发器实现
1
2
3
4
5
6
7
8
9
10
11
12
13module ShiftReg(A, E, clk, rst);
output A;
input E, clk, rst;
reg B, C, D;
always @(posedge clk or posedge rst) begin
if (rst) begin
A<=0; B<=0; C<=0; D<=0;
end
else begin
A<=B; B<=C; C<=D; D<=E;
end
end
endmodule- 通用移位寄存器(移位时,输出可以用
bit0和bit7)
1
2
3
4
5
6
7
8
9
10
11
12
13
14module ShiftRegister8(input s1, sr, clk,
input [7:0] ParIn,
input [1:0] m,
output reg [7:0] Parout);
always @(negedge clk) begin
case (m)
0: ParOut <= ParOut;
1: ParOut <= {ParOut [6:0], sl};
2: ParOut <= {sr, ParOut [7:1]};
3: ParOut <= ParIn;
default: ParOut <= 8'bX;
endcase
end
endmodule
序列检测器
确定功能
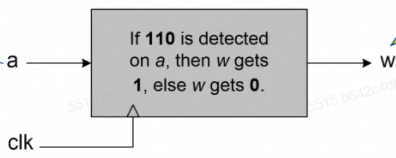
代码实现
- 状态机实现
1
2
3
4
5
6
7
8
9
10
11
12
13
14
15
16
17
18
19module Detector (input a, clk, reset,
output w);
parameter [1:0] s0=2'b00, s1=2'b01, s2=2'b10, s3=2'b11; // 定义状态
reg [1:0] current, next;
always @(posedge clk) begin // 更新状态,时序逻辑
if (reset) current <= s0;
else current <= next;
end
always @(*) begin // 更新激励,组合逻辑
next = s0; // 相当于defalut,覆盖所有情况(高阻之类的)
case (current)
s0: if (a) next = s1; else next = s0;
s1: if (a) next = s2; else next = s0;
s2: if (a) next = s2; else next = s3;
s3: if (a) next = s1; else next = s0;
endcase
end
assign w = (current == s3) ? 1 : 0; // 输出
endmodule移位寄存器(检测111)
moore(输出是同步的)
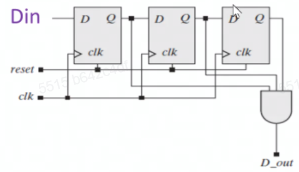
1
2
3
4
5
6
7
8
9module Seq_Rec_3_1s_Moore_Shft_Reg(output D_out, input clk, reset, Din, En);
reg [2:0] current;
always @(posedge clk) begin
if (reset) current <= 3'b000;
else if (En)
else current <= {Din, current[2:1]};
end
assign D_out = (current == 3'b111) ? 1 : 0;
endmodulemealy(输出跟输入有关)
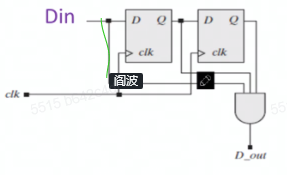
1
2
3
4
5
6
7
8module Seq_Rec_3_1s_Mealy_Shft_Reg(output D_out, input clk, reset, Din);
reg [1:0] current;
always @(posedge clk) begin
if (reset) current <= 2'b00;
else current <= {Din, current[1]};
end
assign D_out = ((current==2'b11) && Din) ? 1 : 0;
endmodule
同步器
功能:将不同时钟域的时钟同步

中间毛刺可能是竞争冒险导致的,一般不需要考虑(glitch)
亚稳态:锁信号时,
adata刚好发生改变,解决:- 低时钟域到高时钟域
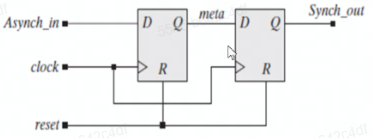
- 高时钟域到低时钟域(把输入当
clk,保证了信号都能采到
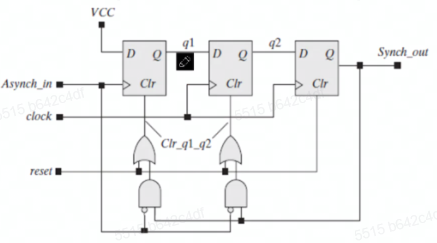
实现
- 普通同步器(采样一次)
1
2
3
4
5
module Synchronizer (input clk, adata,
output reg synched);
always @(posedge clk)
synched <= adata;
endmodule
vivado使用
创建工程和添加文件
打开
vivado软件,可以看首页的Quick Start,点击Create Project进入创建工程界面进入后选择路径,进入下一步,选择
RTL Project,选择Do not ...(一般建好工程再添加文件)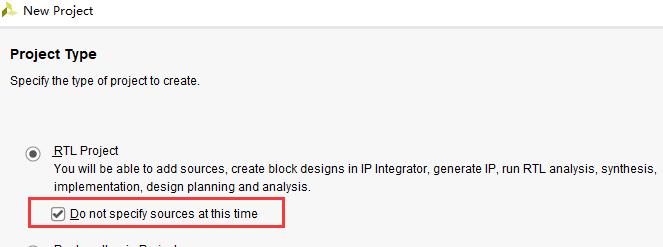
选择芯片型号后,选择
Finish,可以看到如下界面: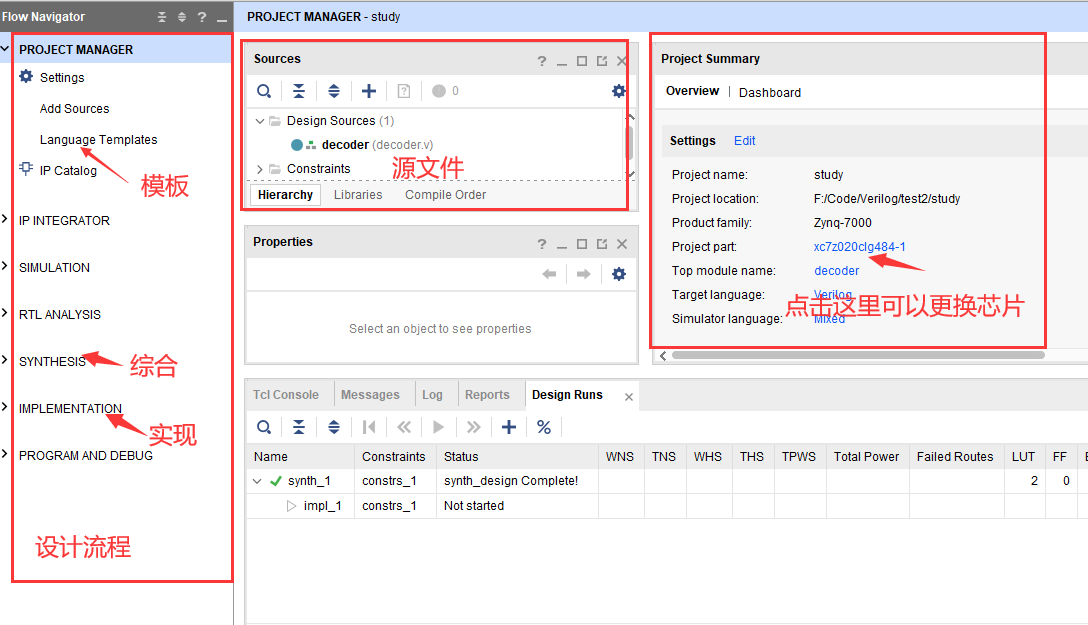
综合和分析
在
Design Sources中添加源文件,完成代码编写在右边框的综合中选择
Run Synthesis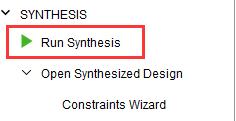
Launch Runs弹窗选择ok即可Synthesis Completed看情况选择,如果不实施选择View Reports即可完成后点击综合中的
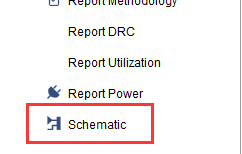
Schematic可以查看原理图